

Background
So you got your brand new MacBook Pro. And now you are dreading the time you are going to spend setting it all up. I was. It is a time sink. So I made a little guide that is selfishly for myself in the future if I were to format this one or buy another one. Someday I’ll script it all as a brew bundle and just install it.
So let’s get into it then.
When you turn the machine on
You’ll generally have some battery life. Mine lasted for more than 3 hours when I got it. It was just mind blowing for me as I hadn’t used a laptop on battery in ages. Even the work laptop I have is mostly plugged in and that one is run by an Intel processor that’s notorious for power consumption.
As you boot
As you boot up your system, you’ll be asked to setup a lot of things. I did skip a couple of items. But what I did do was setup the credentials and the fingerprint reader! Trust me that makes logging in a lot easier!
Apple ID
You need an Apple ID. This is a unique ID that you get to use in the Application Store for downloading stuff. You can opt to skip some of the setup - like the payment information can be configured later.
MacBook credentials
This is just used for logging into your MacBook. I have kept both my MacBook credentials and AppleID separate. I generally do this as it is a security best practise and I don’t reuse my passwords. I leave it to a password manager.
After you boot
By this time you have configured all the bare necessities to get your machine on and look at your desktop. This is when I realised that Apple comes with a lot of preloaded applications that I don’t use or subscribe to like Apple Music, Podcasts, Apple TV etc. I also learned that Apple had their own spreadsheets app called Numbers! I wonder how I hadn’t heard of this ever!
The app store
I checked the app store and I was susprised as it looked boring. There weren’t any recommendations or lsitings like the Android store! But the search was alright, fast and nimble.
Browser
My favourite browser of all time is Mozilla’s Firefox. So as soon as I got in the system, opened Safari and downloaded Firefox Developer Edition. That’s when I realised I hadn’t installed my password manager yet!
Password Manager
1Password has been my trusted password companion for a couple of years now. I don’t even remember when I started using their services but there was no looking back. Over the years they have gotten better and better.
Configuring 1Password
1Password generally has a feature to scan a QR Code from an existing device where you have configured 1Password to quickly setup 1Password on your new device. Unfortunatley, MacBook’s camera couldn’t read the QR Code. I didn’t waste time trying to find out why as I really wanted to get everything setup in 2 hours. That was just an artificial deadline I gave myself to stay focused.
So the alternative was the boring old way of typing the details manually. This didn’t take long except for typing the long secret key. Maybe 2 minutes in total.
In MacOS, once you have configured 1Password, you’ll have the option to open 1Password’s Quick Access using ⬆︎ + command + space. Try this out, this is a really easy way to access credentials on your machine quickly.

Terminal
I prefer iTerm2 as it a terminal that supports tabbed sessions and panes and all the cool stuff like running GNU screen or tmux! If you like the sound of it, then download it. Read more about theWhy.
Terminal Customisation
Like any developer who spends a significant portion of their time writing stuff on the terminal - which I don’t do anymore but I used to a lot, I still want my terminal to look good.
Ever since I started using MacOs, it has had the default shell as zsh. So for terminal customisation I used oh-my-zsh.
This isn’t sufficient.
You need to pick a theme. My favourite theming tool for oh-my-zsh is powerlevel10k and I use the agnoster theme. powerlevel10k comes with a nice interactive setup on the terminal that lets you configure things. Read the docs to find out how. Hint: p10k configure.
Installing other tools
HomeBrew
Homebrew is MacOs’s unofficial but extremely useful package manager. Everytime I get a Mac, I install it and do the rest of the installs through it. I’ll have a post on HomeBrew coming soon. What did I install using brew?
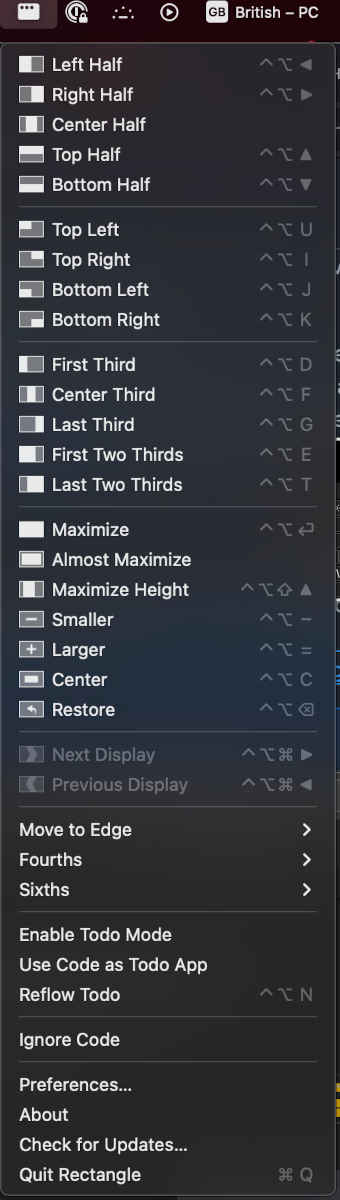
Window Management
Microsoft Windows, probably because of its name, comes with extremely useful window management shortcuts. This was a big problem for me when I switched to using MacBook because MacOS lacks all of these cool shortcuts! Such a shame!
I use Rectangle for this, it is open source and you pretty much feel at home if you come from Windows.
You can then move around windows using Rectangle’s shortcuts.

Keyboard layout
If you have a Windows PC in the UK at home and a keyboard that matches it, then you will probably be very confused with the MacBook Pro’s keyboard. The @ and the "’s are in the wrong place!
This is not really wrong. It is just that British - PC keyboard layout is diferent from a British - Mac keyboard layout!
This got me annoyed when I first started using a MacBook. But once I realised the problem, all I had to do was install the right keyboard layout in the MacBook to match my regular keyboard layout.
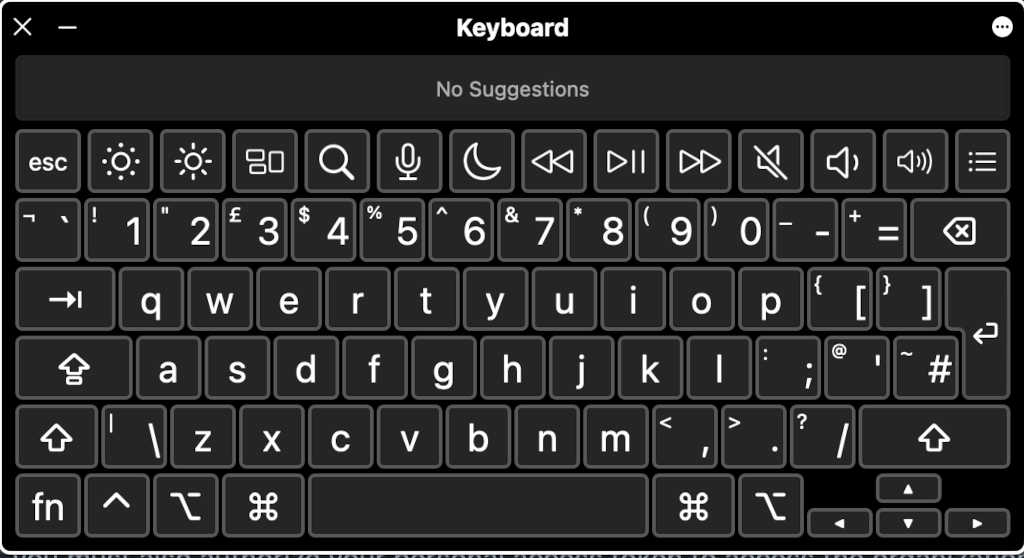
This was necessary as muscle memory is something that helps you become more productive.
That’s all folks
I know it is not much but just some of the nice tools I use to setup my personal computer. I hope it helps.