
What are Azure Logic Apps?
Azure Logic Apps are an Azure service that lets you visually build integrated solutions to connect several different apps and services together, and comes with a click and select interface. It enables you automate business processes without writing any code at all!
What is business process?
A business process or workflow is a sequence of tasks that produce some sort of outcome, which may be some data, decision, notification.
Some examples :
- You run an e-commerce store and have a twitter account. you could search twitter for tweets about your brand, analyse the sentiment of the tweet and take appropriate action. Like if the tweet was positive, then automatically respond with Thanks. Whereas if it was negative, then forward it to a customer representative who could then liaise with the customer.
- You run a blog, so popular hosted on Azure Static Web App or on Azure Storage, that whenever you create a new post, you want your subscribers to get a link to it via email.
- You have data in one database on one server that you have to import to another database on another on a regular basis, both hosted on the cloud, without writing any new code apart from the SQL statement for the import.
As a coder, maybe a low code or no code solution might not sound very exciting. However, imagine use-cases where writing code would have cost you way too much time and effort than the return on investment. If you are a coder, Logic Apps could be a great way to automate mundane tasks you have been thinking of doing but never had the time to because the initial effort to get the boiler plate integration code would be a pain to get through, simply because the said workflow requires multiple service integrations.
Well, worry no more because Azure Logic Apps is you friend here.
Why is it so awesome?
The collection of diverse range of pre-built components that work well together makes is so easy to automate several different kind of workflows. There are connectors to plenty of external services like:
- Oracle
- Salesforce
- SQL Server
- Office 365
- Google Services (Calendar, contacts, drive, etc)
- Slack
- SAP
- Adobe (create PDF like a pro from multiple formats)
For a full range of available connectors, go check out the docs.
The platform is built to be extensible. If you don’t find a pre-made component, you can build your own Azure function that you invoke from your logic app to integrate with.
In short, it is the application integration platform that you didn’t know you needed.
Basic concepts
To get a better understanding it is always better to visit some of the key concepts that make up an Azure Logic App.
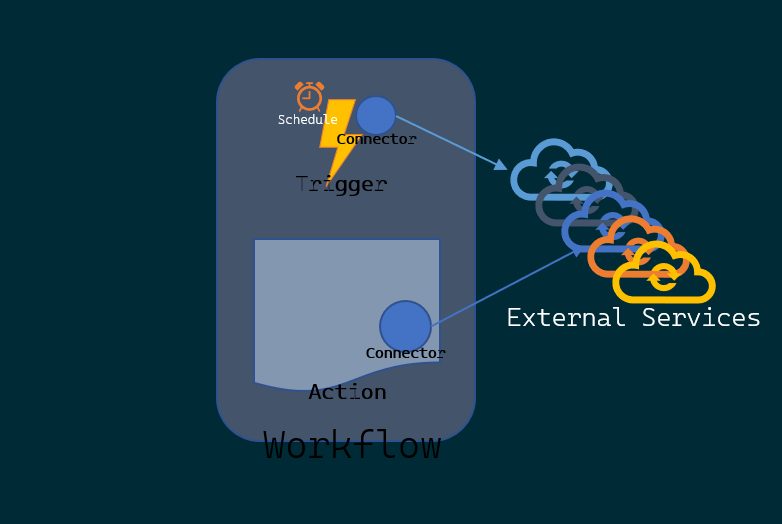
- Workflow: a sequence of tasks that does something - produces an outcome
- Trigger: Event that occurs when a set of conditions are satisfied that starts a workflow!
- Action: Operation that executes a task in your business process. Actions are always things that happen after a trigger.
- Connector/Component: An interface to an external service. A container for related triggers and actions.
- Outlook 365 connector does all things email, calendar and contacts of your Outlook 365
- Something that connects to an API
To summarize, a trigger kicks off a workflow. Both could be connectors to an external service. One listens, the other responds. I have managed to draw out the concepts if it makes it easier to remember:
How to create a Logic App?
There are plenty of ways to make a logic app.
- Create Logic apps - Portal
- Create Logic apps - Visual Studio
- Create Logic apps - Visual Studio Code
- Create Logic apps - ARM Template
- Create and Manage Logic Apps - Azure CLI
Plenty of options. This does not mean in anyway that you have to know all of the ways you can do it. You could choose one that suits your needs. Like if you use Visual Studio in your org and would like to create a deployment pipeline, follow that link.
I use Visual Studio and I would rather have my application in code so that I can deploy the same app, with some tweaked configuration to multiple environments to enable continuous integration and delivery. The reason I am writing this post is to share what I learned about making a logic app and automating its deployment using Azure Devops.
Creating a logic app using Visual Studio
To follow along, I thought I would create a Logic App that does something very silly. You must be wondering, “but the Microsoft Docs already has an example”. Yea, very true.
That example uses an RSS Feed and Microsoft Outlook integration, both of which I do not have. So I thought I would make something simpler and easier to start with.
This sample Logic App gets triggered when you make an HTTP request and Sends the content of the Body of the HTTP request using SendGrid API to a specific account.
Prerequisites
In order to create a logic app using Visual Studio following the steps in this post, you need the following:
An internet connection - without which you wouldn’t be reading this.
A visual studio installation, preferably 2017 or 2019 with Azure Development Workload.

The latest Azure Logic Apps Tools for the Visual Studio extension for the version that you want:
You can either download and install Azure Logic Apps Tools directly from the Visual Studio Marketplace, or learn how to install this extension from inside Visual Studio. Make sure that you restart Visual Studio after you finish installing.
A free Twilio SendGrid account
- configure it for Single Sender - one email address as sender and
Reply To- You will have to verify it by clicking on a link that comes to your chosen email address
- Choose the
WebApioption with an ApiKey. I believe the SMTP one is not very different but I haven’t tried it myself, so can’t recommend it yet. - I did send emails from my email address associated to this blog’s domain
- configure it for Single Sender - one email address as sender and
A Microsoft Azure and Azure Devops subscription
What does the app look like?
After following the steps you will get a workflow with a trigger and an action.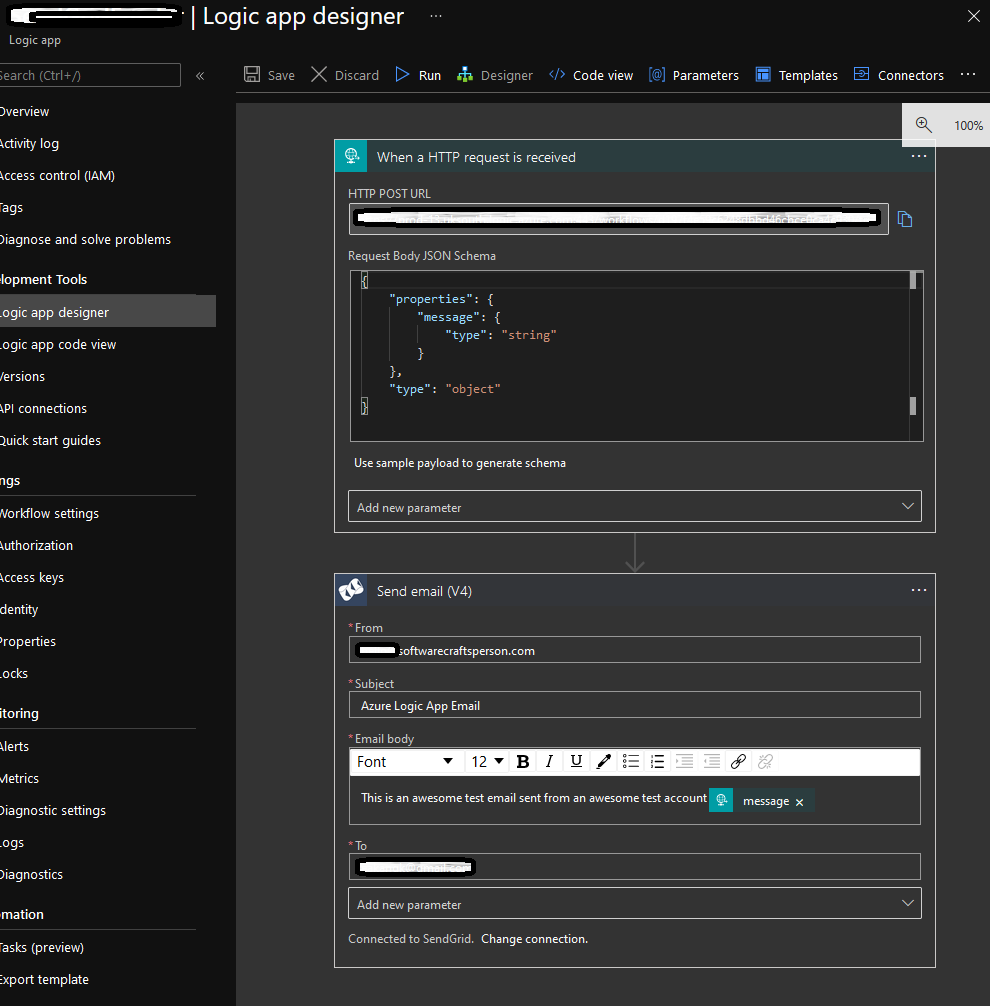
Get to Visual studio
- Open up Visual Studio
- Create a new project
- Choose an Azure Resource Group project

- Choose your favourite name and location for the project. I went with something very boring
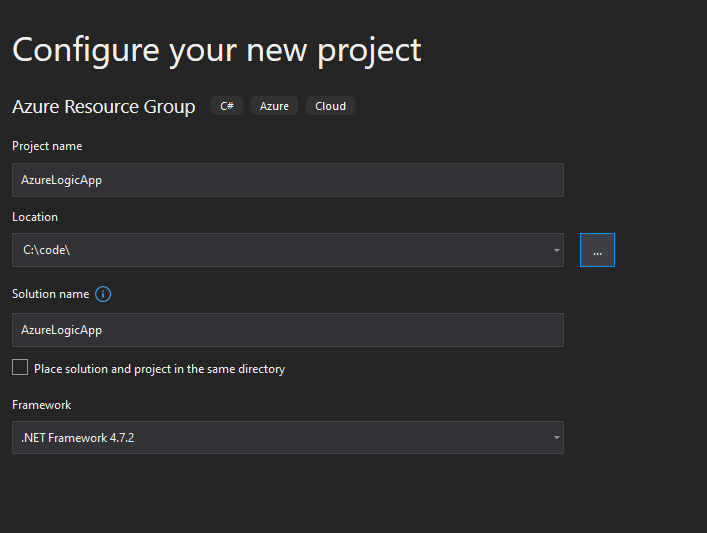
- Oh yea, it is not .NET Core. I was confused initially, but it is what it is and is not a problem at all. Remember that you are not going to write code here.
- Choose an Azure Resource Group project
- Click create and it presents you with another dialog window asking you to choose which Azure Resource Group template you need. Obviously in our case, pick the Azure Logic App

- This should present you with a solution explorer folder tree like this:
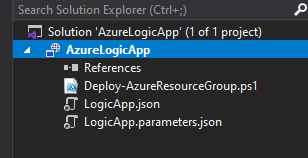
Folder structure summary
LogicApp.json- This is the ARM deployment template, a json file that represents an Azure Resource that can be used to deploy for the purpose of automation.LogicApp.parameters.json- A file with the parameters used by the LogicApp.Deploy-AzureResourceGroup.ps1- powershell script used to do the magic of validating and deploying the resource.
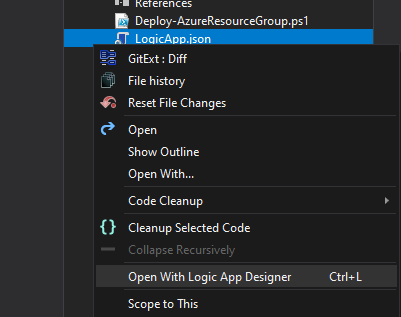
Back to creating the Logic App using Designer view in Visual Studio
Right clicking the Logic App project actually brings up some interesting options.
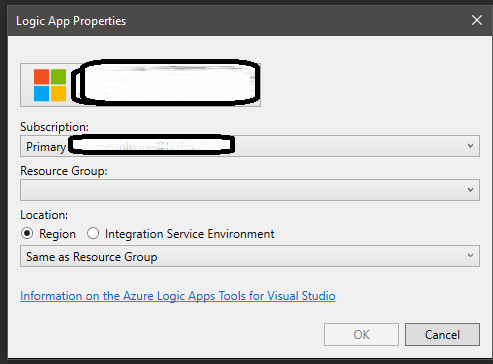
Once you hit OK you’ll be presented with a LogicApp.json tab with what you would be presented in the portal.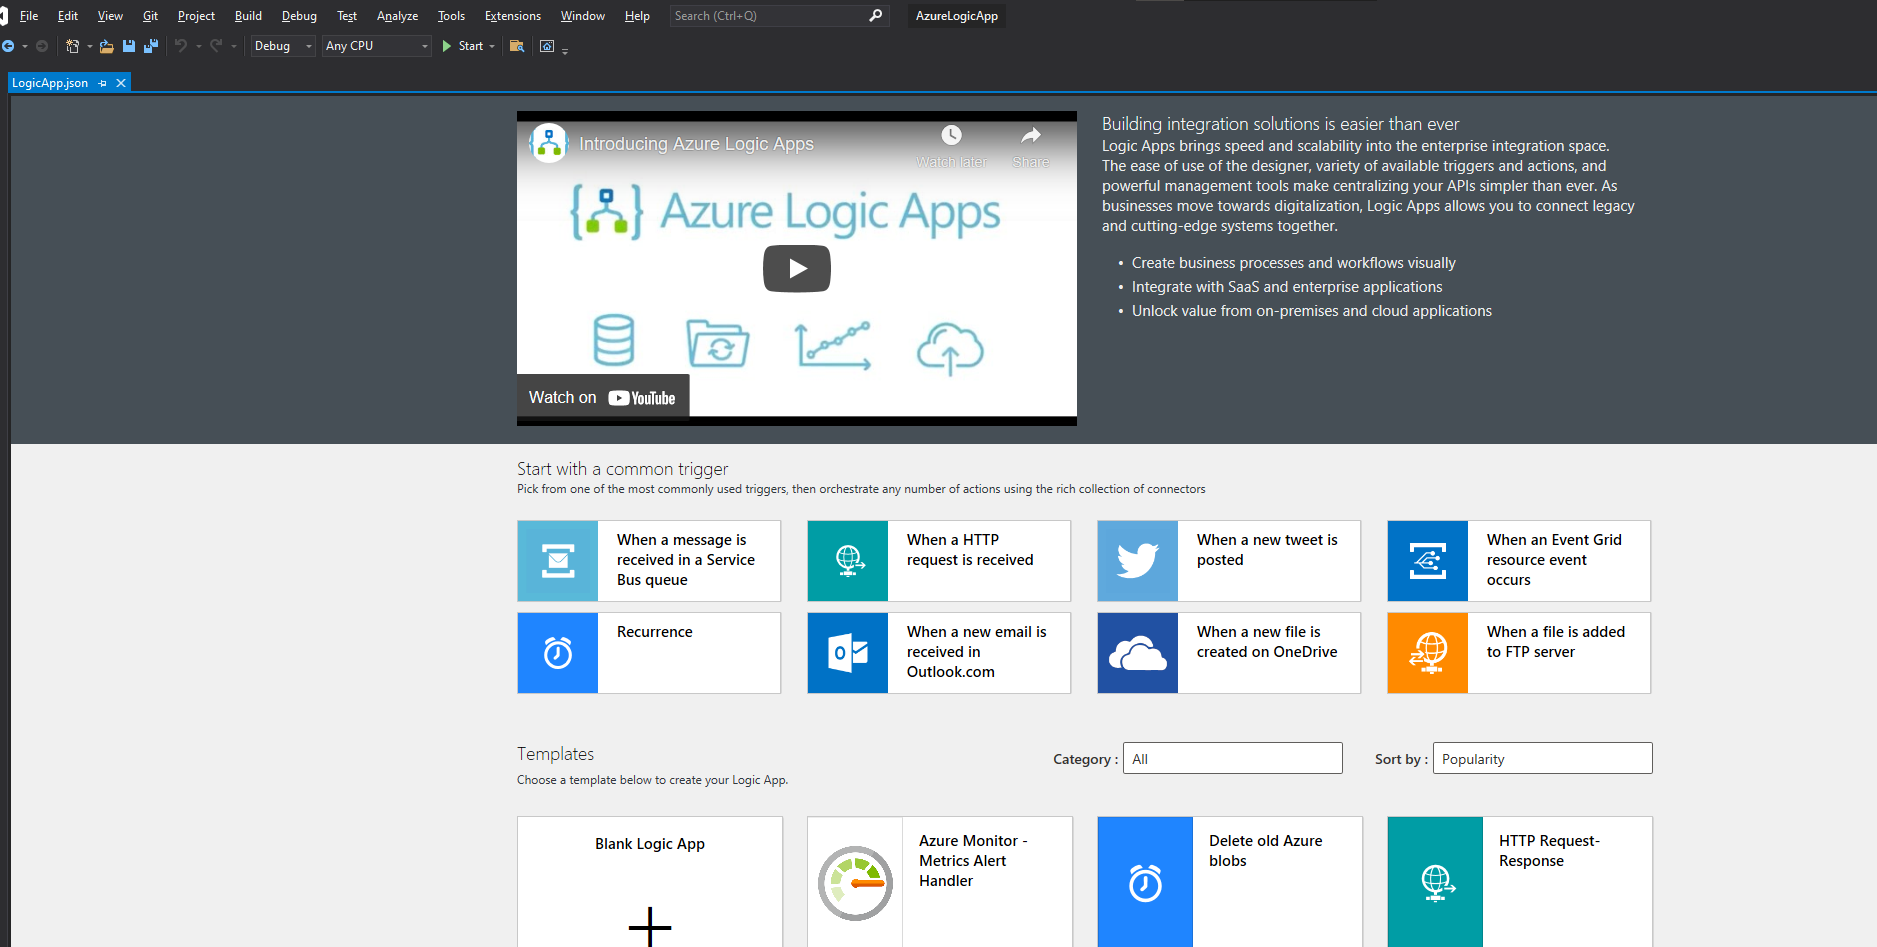
This is currently not compatible with the Dark Mode or Dark themes in Visual Studio. This does not mean you cannot create the app, just that the background will be light themed.
You can now start with a common trigger or start with a blank logic app. It is totally up to you. But as you the structure of what we are going to create, you might as well start with the trigger needed to create the app.
- When an HTTP request is received trigger
- Followed by Send Email (V4) by SendGrid.
You can search for connectors using the search box: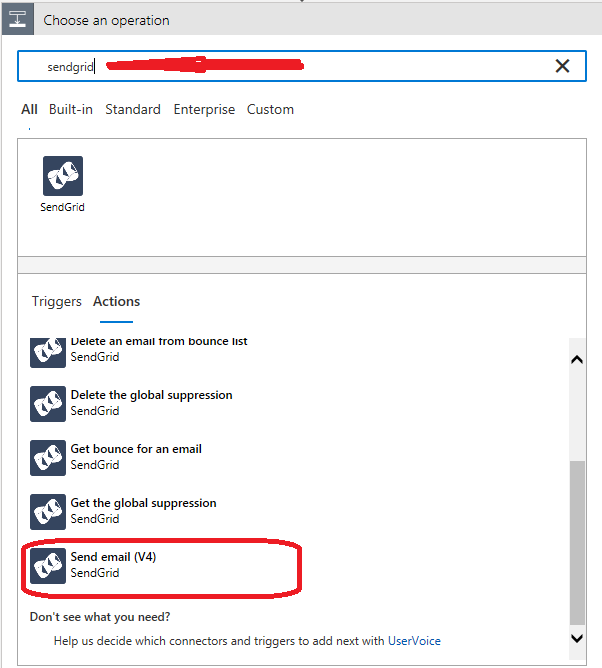
Every task has a menu in the top right corner of the box that represents it. I think in Visual Studio this is not visible properly due to some bug but in the portal you can clearly see this.
If you open it you’ll find options to delete the task and other things.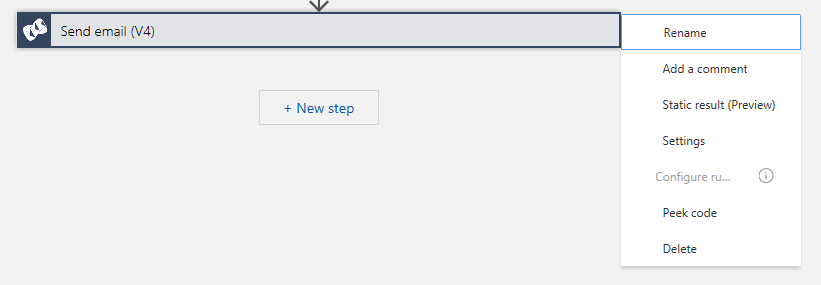
SendGrid secrets
For SendGrid, you have to input the API Key. If you have already configured a SendGrid connection in the subscription and resource group previously, then that will automatically be used for this logic app. However, if you have not then you will be prompted to input the details - A connection name and the API Key. At this point you may add it as a secret from a key vault or however you choose. The best practice is to use Azure Keyvaults to manage your secrets. In fact, you can create a key vault from your command line using the following bash script:
How to create a Key Vault using Azure CLI for template deployment
#!/bin/bash -e
# A script to create an az KeyVault enabled for template deployment

#Change the values below before running the script
vaultName="fantastic-vault-name"               #Globally Unique Name of the KeyVault
vaultLocation="VaultLocation"           #Location of the KeyVault
resourceGroupName="ResourceGroupName"        #Name of the resource group for the vault
resourceGroupLocation="ResourceGroupLocation"   #Location of the resource group if it needs to be created

#Login and Select the default subscription if needed
#az login
#az account set "subscription name"
#az config mode arm

#az group create "$resourceGroupName" "$resourceGroupLocation"

az keyvault create --name "$vaultName" --resource-group "$resourceGroupName" --location "$vaultLocation" --enabled-for-template-deployment true
You can create a .sh file with the contents of the code above and run it in a azure cloud shell/bash, provided you have configured the Azure CLI’s default options for subscription set and are also logged in, it will create the key-vault for you and enable it for template deployment too.
Or you could just clone this application’s git repository from github and run the az-kv-create-with-secrets.sh file with the names and values of variables of your choice.
Read all about Azure CLI in Microsoft Docs
How to get the message from the Trigger Payload to the SendGrid task ?
In Logic App designer view, whenever you are adding a task to workflow, if there was a previous task in the same workflow, you will be able to access that. The designer view presents you with a pop to refer to a param from the previous task.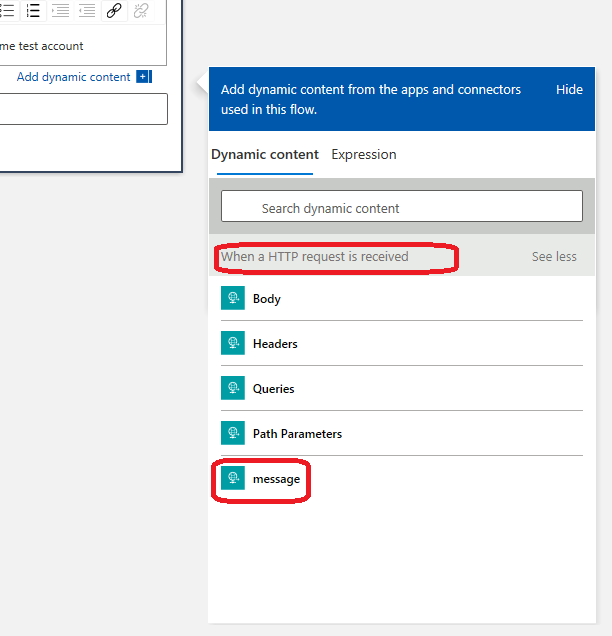
Deploy the app using Visual Studio
Once you have added trigger and action and filled in all the necessary input, you should see your app like this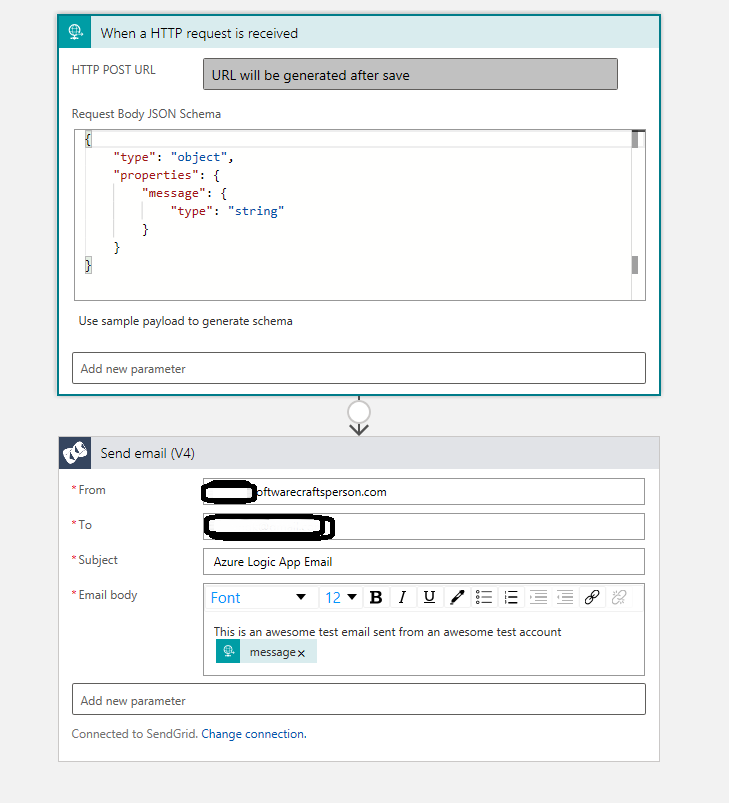
Create an Azure Devops Project, a Git Repository and a pipeline
This part of the tutorial focusses on getting all that you have done so far in an automatically deployable pipeline.
So far you have been editing your project without it being committed to a source control. So now might be a good time to visit Azure Devops and create a project and a repository and then setup your project in Visual Studio to use that repository as your remote origin.
Push your changes to remote and then let us create a pipeline using Azure Devops portal.
Steps to create pipelines on Azure DevOps
- Go to the Pipelines page on Azure Devops.
- Click on the New Pipeline button on the top right corner
- This should present you with an option to choose where your code is
- pick Azure Repos Git
- choose the repository for your logic app
- in Configure step, pick Starter pipeline with minimal steps

- Now you will get the contents of your yaml to be pipeline, this might be populated with some basics about the structure of the yaml
- Will have a
trigger,pool,stepsandscripts
- Will have a
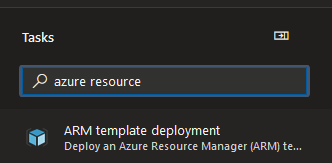
- In the top right corner of the code editor, you’ll see a button to show assistant, click on it and get some assistance and search for Azure resource
- Read more about some of the params in Azure Resource Group Deployment task docs
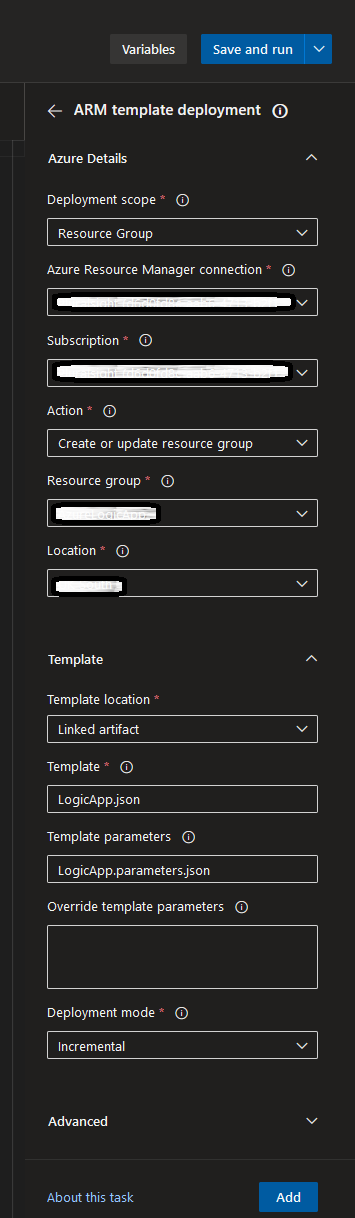
- Click Add after filling in the right details.
- Read more about some of the params in Azure Resource Group Deployment task docs
Give me the YAML already
Your YAML file should look something like this:
# Starter pipeline
# Start with a minimal pipeline that you can customize to build and deploy your code.
# Add steps that build, run tests, deploy, and more:
# https://aka.ms/yaml

trigger:
- master

pool:
  vmImage: ubuntu-latest

steps:
- task: AzureResourceManagerTemplateDeployment@3
  inputs:
    deploymentScope: 'Resource Group'
    ConnectedServiceName: 'AzureDevopsServiceConnectionNameConfiguredInProjectSettings'
    subscriptionName: 'AzurePortalSubscriptionId'
    action: 'Create Or Update Resource Group'
    resourceGroupName: 'NameOfYourAwesomeResourceGroup'
    location: 'TargetLocation'
    templateLocation: 'Linked artifact'
    csmFile: '**/LogicApp.json'
    csmParametersFile: '**/LogicApp.parameters.json'
    deploymentMode: 'Incremental'
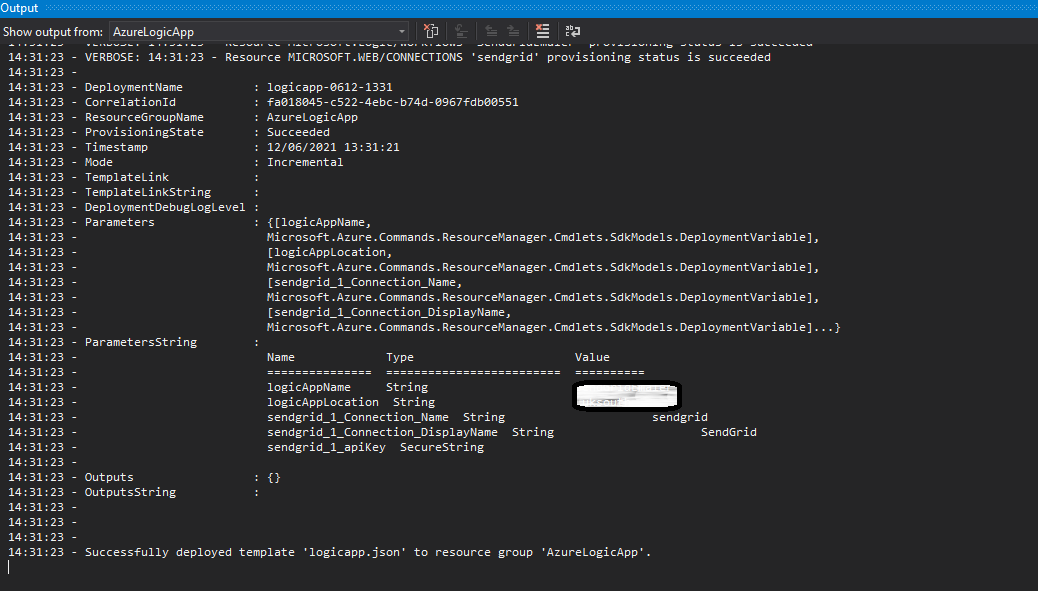
Now that you can view your finished pipeline file, use the Save and Run button, commit to main branch for the sake of this tutorial and watch your pipeline deploy your Logic App to Azure.
Using Stages and Deployment Jobs in your pipelines
Azure Pipelines have a concept called Deployment Jobs which are special jobs that are run against an environment and can be used to track a full deployment history. It also gives you the ability to choose a deployment strategy like runOnce, rolling and canary. I am not going to cover the details of each type in this post as it is way beyond the scope of this post. For this example, I will be using the runOnce strategy as all I need to do is deploy the app once to my desired environment.
Example
This actually seemed like an easy thing to do. However, I did not realise that my deployment stage could not access the source files directly. Thus simply changing the previous steps > task into a stage > jobs > strategy > deploy > steps > task did not work.
I had to publish the template files, the json ARM templates, as Pipeline artifacts. Which could then be consumed by the deployment job by downloading it when it needed. In fact, I had to search around for this to come up with a solution. I tried several times before I realised this was what was required. I even asked a question on Stackoverflow to find out if I could get some answers.
I also shared the question with AzureDevops on Twitter.
https://x.com/eakangk/status/1404031558797963266
Neither attempts had any success. But I just kept trying out different things and found it out myself. The docs were pretty good and guiding me, it just that you must know where to look for something.
Anyhow, looking at the YAML, the key difference between this and the earlier method is that, now I have stages explicitly in the YAML.
- stage: 'PublishArmTemplatesStage'
  displayName: 'PublishArmTemplatesStage'
  jobs:
  - job: 'PublishArmTemplatesJob'
    displayName: PublishArmTemplatesJob
    pool:
      vmImage: ubuntu-latest
      workspace:
        clean: all
    steps:
    - task: CopyFiles@2
      inputs:
        Contents: $(Build.SourcesDirectory)/AzureLogicApp/**/*.json
        targetFolder: $(Build.ArtifactStagingDirectory)

    - task: PublishPipelineArtifact@1
      inputs:
        targetPath: $(Build.ArtifactStagingDirectory)
        artifactName: armtemplate

- stage: PVDeployJobStage
  displayName: PVDeployJobStage
  jobs:
  - deployment: PVDeployJob
    displayName: PVDeployJob
    pool:
      vmImage: ubuntu-latest
      workspace:
        clean: all
    environment: development
    strategy:
     runOnce:
       deploy:
         steps:
         - task: DownloadPipelineArtifact@2
           inputs:
             artifact: armtemplate

         - task: AzureResourceManagerTemplateDeployment@3
           inputs:
             deploymentScope: 'Resource Group'
             ConnectedServiceName: $(PVConnectedServiceName)
             subscriptionName: $(PVSubscriptionId)
             action: 'Create Or Update Resource Group'
             resourceGroupName: $(PVResourceGroup)
             location: $(PVLocation)
             templateLocation: 'Linked artifact'
             csmFile: $(Pipeline.Workspace)/armtemplate/**/LogicApp.json
             csmParametersFile: $(Pipeline.Workspace)/armtemplate/**/LogicApp.parameters.json
             deploymentMode: 'Incremental'
In this YAML, I have two stages. The first stage publishes the ARM template as a Pipline Artifact. This is a newer version of Build Artifact, which I only learned while working on this example. I have only ever used Build Artifacts in any of my pipelines. According to Azure docs, Pipeline Artifacts allow you to share an artifact between stages or even between pipelines! In my case, I am only just sharing it between stages.
In the second stage, you can see the two tasks, DownloadPipelineArtifact task and the AzureResourceManagerTemplateDeployment task. The first one to download the JSON ARM templates so that I can give it to the second job to actually deploy the Logic App.
Parameterize pipeline or add stages
You may choose to add variables, so that you can have the same pipeline deploy to different subscriptions or resource groups. Or you can create multiple stages to deploy the same logic app to Development, Test and Production. This is again, stuff you can find out on Pipeline documentation. But in short, it means, adding stages to your YAML file, and having a copy of the same task but with different set of inputs per stage.
What about Secrets?
You could integrate Secrets from Azure Key Vaults into your pipeline too, ensuring that your YAML file has no sensitive information. This is another best practice that you must aim to adopt for pipelines. This is not very straightforward. I have had some issues, specifically with this Azure Resource Manager Template Deployment task. I will be asking a question about this on stackoverflow and see if I get any answers from the community. I am debugging why this isn’t working as expected in my pipeline currently. Will update the post then.
Pipeline variables as secrets
Pipeline Variables set to be secret does not seem to work as input to tasks despite following every bit of syntax as described in the docs.
Example
I set the following vars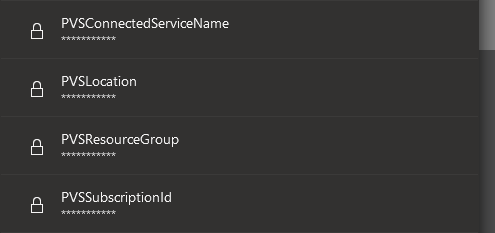
variables:
  SECRET_CSN: $(PVSConnectedServiceName)
  SECRET_SUB: $(PVSSubscriptionId)
  SECRET_RG: $(PVSResourceGroup)
  SECRET_LOC: $(PVSLocation)

trigger:
- master

stages:
- stage: PVSDeployJobStage
  displayName: PVSDeployJobStage
  jobs:
  - deployment: PVSDeployJob
    displayName: PVSDeployJob
    pool:
      vmImage: ubuntu-latest
      workspace:
        clean: all
    environment: development
    strategy:
      runOnce:
        deploy:
          steps:
          - task: DownloadPipelineArtifact@2
            inputs:
              artifact: armtemplate

          - task: AzureResourceManagerTemplateDeployment@3
            inputs:
              deploymentScope: 'Resource Group'
              ConnectedServiceName: $(SECRET_CSN)
              subscriptionName: $(SECRET_SUB)
              action: 'Create Or Update Resource Group'
              resourceGroupName: $(SECRET_RG)
              location: $(SECRET_LOC)
              templateLocation: 'Linked artifact'
              csmFile: $(Pipeline.Workspace)/armtemplate/**/LogicApp.json
              csmParametersFile: $(Pipeline.Workspace)/armtemplate/**/LogicApp.parameters.json
              deploymentMode: 'Incremental'
This fails every single time with the following error:
echo the values of those secrets in a file and that works fine without any problems at all.
- stage: PrintSecrets
  jobs:
  - job:
    steps:
    - task: CmdLine@2
      displayName: 'Print Secrets to file'
      inputs:
        script: 'echo "$(PVSConnectedServiceName) $(PVSSubscriptionId) $(PVSLocation)" > $(System.DefaultWorkingDirectory)/pipelinesecrets.txt'

    - task: CopyFiles@2
      inputs:
        Contents: $(System.DefaultWorkingDirectory)/pipelinesecrets.txt
        targetFolder: $(Build.ArtifactStagingDirectory)/secrets

    - task: PublishPipelineArtifact@1
      inputs:
        targetPath: $(Build.ArtifactStagingDirectory)/secrets
        artifactName: secretdrop
Azure Key Vault Secrets in Variable Groups
Before you do this, remember to create a Key Vault and store your secrets there and also create access policies that will allow Azure Pipelines to use the Key Vault for deployment.
You could refer to key vault creation script in my Github repo to understand how to create key vaults from command line and also set a few secrets through it and enable it for template deployment.
Sadly though, this also doesn’t seem to work!
variables:
- group: azure-logic-app-deploy
- name: vgsResourceManagerConnection
  value: $[variables.ResourceManagerConnection]
- name: vgsSubscriptionName
  value: $[variables.SubscriptionName]
- name: vgsLocation
  value: $[variables.Location]
- name: vgsResourceGroup
  value: $[variables.ResourceGroup]

stages:
- stage: PVSDeployJobStage
  displayName: PVSDeployJobStage
  jobs:
  - deployment: PVSDeployJob
    displayName: PVSDeployJob
    pool:
      vmImage: ubuntu-latest
      workspace:
        clean: all
    environment: development
    strategy:
      runOnce:
        deploy:
          steps:
          - task: DownloadPipelineArtifact@2
            inputs:
              artifact: armtemplate

          - task: AzureResourceManagerTemplateDeployment@3
            inputs:
              deploymentScope: 'Resource Group'
              ConnectedServiceName: $(vgsResourceManagerConnection)
              subscriptionName: $(vgsSubscriptionName)
              action: 'Create Or Update Resource Group'
              resourceGroupName: $(vgsResourceGroup)
              location: $(vgsLocation)
              templateLocation: 'Linked artifact'
              csmFile: $(Pipeline.Workspace)/armtemplate/**/LogicApp.json
              csmParametersFile: $(Pipeline.Workspace)/armtemplate/**/LogicApp.parameters.json
              deploymentMode: 'Incremental'
What am I doing here?
The variable group azure-logic-app-deploy was associated to an azure key vault which could be accessed via the pipeline. When using Variable groups, remember to also give pipelines access to the variable group.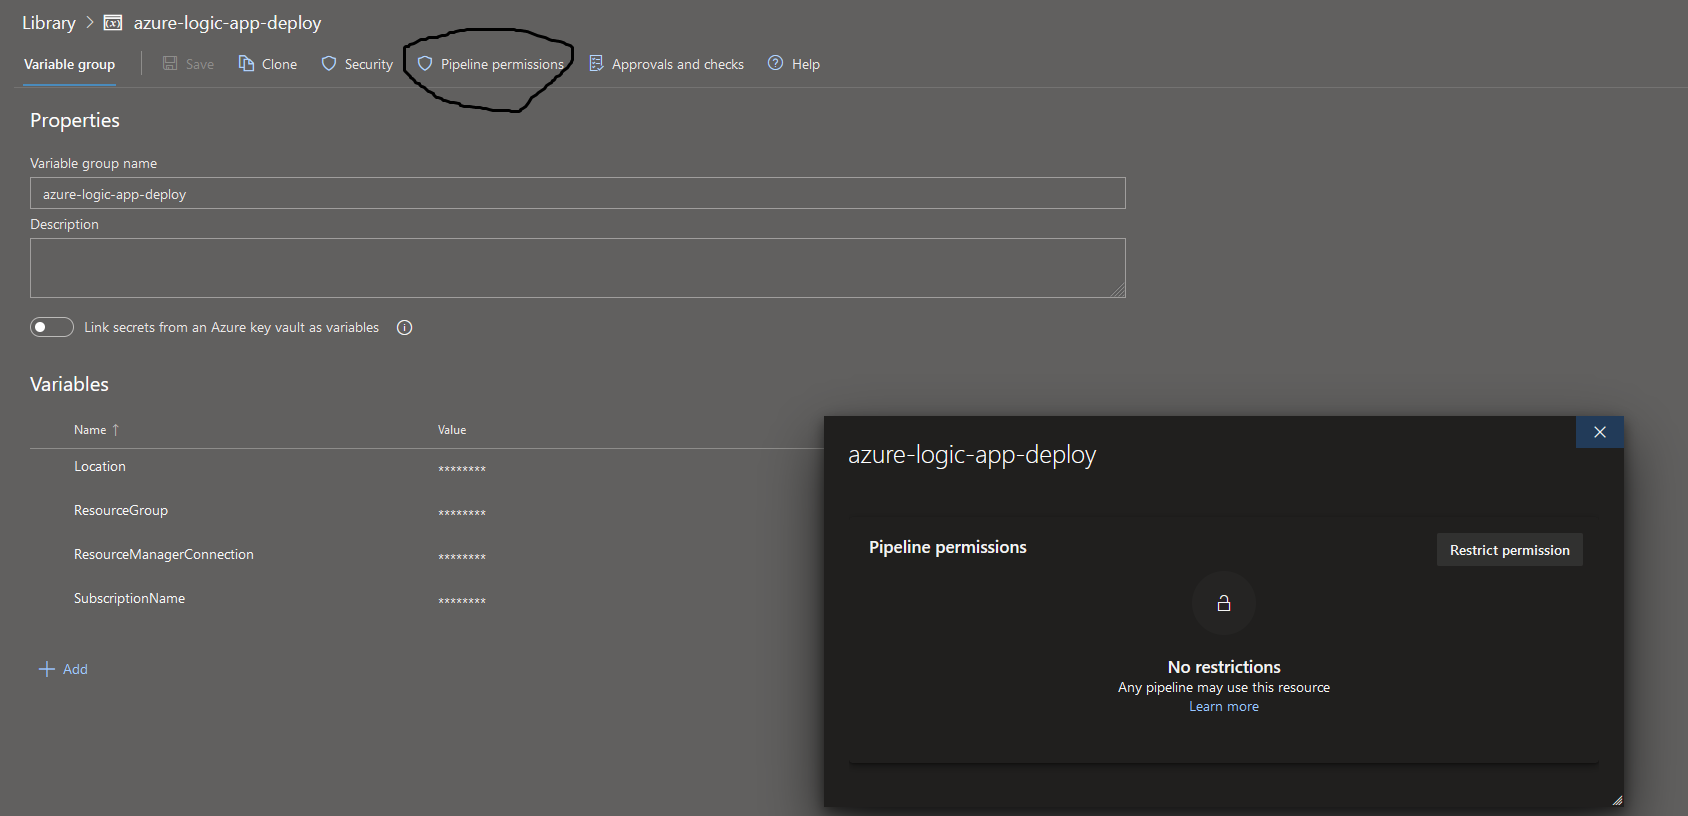

Using Azure Key Vault task in the pipeline
After several failed attempts at trying to read secrets from a variable group that was linked to Azure Key Vault, I kept looking for alternatives and came across a pipeline task call Azure Key Vault. This made me think, maybe we don’t need a variable group and we might just be able to run the pipeline by directly connecting it with the Key Vault. So I did just that.
- stage: PVSDeployJobStage
  displayName: PVSDeployJobStage
  jobs:
  - deployment: PVSDeployJob
    displayName: PVSDeployJob
    pool:
      vmImage: ubuntu-latest
      workspace:
        clean: all
    environment: development
    strategy:
      runOnce:
        deploy:
          steps:
          - task: DownloadPipelineArtifact@2
            inputs:
              artifact: armtemplate

          - task: AzureKeyVault@2
            inputs:
              azureSubscription: $(PVConnectedServiceName)
              KeyVaultName: 'send-grid-emailer-vault'
              SecretsFilter: '*'
              RunAsPreJob: true

          - task: AzureResourceManagerTemplateDeployment@3
            inputs:
              deploymentScope: 'Resource Group'
              ConnectedServiceName: $(ResourceManagerConnection)
              subscriptionName: $(SubscriptionName)
              action: 'Create Or Update Resource Group'
              resourceGroupName: $(ResourceGroup)
              location: $(Location)
              templateLocation: 'Linked artifact'
              csmFile: $(Pipeline.Workspace)/armtemplate/**/LogicApp.json
              csmParametersFile: $(Pipeline.Workspace)/armtemplate/**/LogicApp.parameters.json
              deploymentMode: 'Incremental'
In the YAML pasted above, you can see that I am referencing the following secrets from my Azure Key Vault named send-grid-emailer-vault.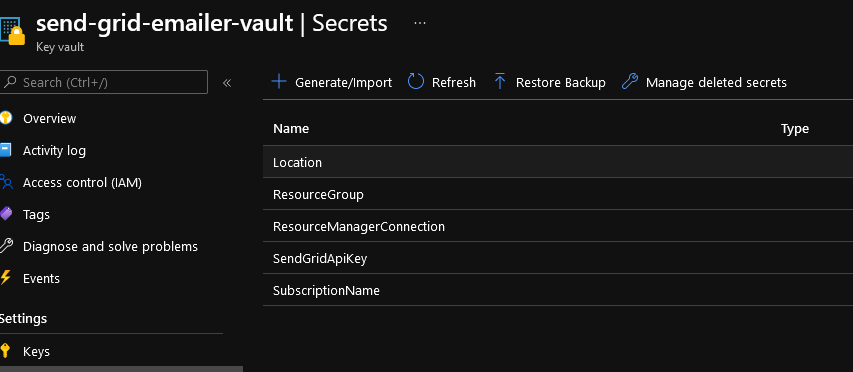
ResourceManagerConnection- the name of the Connected Service on Azure Devops that links it to my Azure Portal subscriptionSubscriptionName- The GUID of the subscription. Not really the name but named it so as the input section calls it name.ResourceGroup- The name of the resource groupLocation- the region where you are deploying to
However, this now fails with the following:
There was a resource authorization issue: "The pipeline is not valid. Job PVSDeployJob: Step input ConnectedServiceName references service connection which could not be found. The service connection does not exist or has not been authorized for use. For authorization details, refer to https://aka.ms/yamlauthz."
Source Code including YAML files
I have committed all the work done so far to both Github and Azure Devops. I tend to do this often, especially while testing out things that I can’t get working at work and also would like to share what I learned on this blog. So I log into my personal account and try out stuff.
You can get find the azure-logic-app source code on GitHub. The project’s README.md should give you an idea of the project structure and scripts.
Although I have failed to get the pipeline working using Secrets, I have learned a lot from this exercise.
I had the Key Vault setup for regular access policies and not Role Based Access Control. I am not entirely sure if this is the reason why the pipelines could not access the secrets and always kept complaining that it had to be authorized, when my key vault already had access policies configured.
TODO and Updates
When I get more time, I will try out other combinations and later update this post with my success and failure stories.
Time spent failing at something is time spent learning after all.
Useful Links
- Azure Pipelines - Key Concepts
- Secrets in Azure Pipelines
- Deployment Jobs in Pipelines
- Jobs in Pipelines
- CopyFiles task in Azure Pipelines
- Predefined Variables in Azure Pipelines
- Difference between AzureResourceGroupDeployment task and AzureResourceManagerTemplateDeployment tasks
- AzureResourceManagerTemplateDeployment task documentation on GitHub
- AzureResourceGroupDeployment task
- Pipeline Artifacts
- Publish Pipeline Artifact task
- Assign an access policy to Key Vault
- Azure ad user show - CLI docs