So last week I did a little example app following instructions by Brad Traversy. To give credit where credit is due, I have linked his video right here in my post. I’m going to share the gist of what I learned here as part of this post. Because sometimes, you might just want to get an overview, you may not want to get hands on and start coding. This is a very high level overview of some of the concepts. And the source code can be found in my github repository.
The video by TraversyMedia covers the concepts in much more detail. So I highly recommend watching it if you are in for more detaails.
This post is just about giving an overview of some of the key concepts introduced as part of the course.
https://www.youtube.com/watch?v=sBws8MSXN7A
ReactJS Crash Course (2019)
What is it?
React/React.js/ReactJS is a front-end JavaScript _library _for building user interfaces for client side applications. Although, it was created by developers in Facebook, it is open-source and currently maintained by not just Facebook but also those amazing developers who contribute to open source projects in their free time.
Although a lot of people call it a framework, React is technically a library. The more react libraries you use, your project could be summed up using React framework. But every aspect of React front end development requires different React libraries. I also think that people call it a framework because they mostly compare it with other frameworks like Angular.
Why use React?
There are several reasons why one would choose to build an app using React.
Firstly, it is pretty easy to learn compared to learning an entire framework to get started. If you have already done javascript based development, you’ll feel right at home. You are pretty much writing code in Javascript. So there is a lot of Javascript experience you can transfer that way.
One of the main reasons, front-end development got popular is because of the need to build applications that are feature rich but is served through a browser. That means, the DOM is continuously manipulated based on user interaction or events or other factors. Manipulating DOM is an expensive operation and will especially slow down the page of the web app and cause terrible user experience if done poorly.
To explain this in detail, let us take an example of displaying a list of items. A lot of UI frameworks out there, are able to render lists. However, when you click and select an item in the list, some of the frameworks render the whole list again, although really quickly, it is still rebuilt despite the fact that only one element had to re-rendered, the cost of this could increase based on the size of the list.
Virtual DOM

React deals with this problem using something called a Virtual DOM. The reason DOM manipulation is expensive is because all the changes to the DOM have to re-rendered on the screen. React’s use of Virtual DOM however, reduces this cost, by having an object representation of the DOM which can be manipulated behind the scenes, without having to render the entire set of elements on the site. This technique of having a Virtual DOM have been used by other frameworks too but React is basically designed around it.
- React keeps track of Virtual DOM objects - which are mapped to the actual DOM elements
- Every time something changes, React _diffs _the changes with the previous state of the element
- Re-renders only the bits of the real DOM that have changed
You can read more at React Kungfu.
React is all about modularized UI components so it is pretty easy to create modularized applications, unless you are an absolutely keen on doing the opposite, which I hope you are not.
Where is the code?
You can find the source code of the app on github.
Brad’s idea of building a Todo List app for learning React is a brilliant idea. I cannot think of a simpler or better way to get started on a framework like this.

In order to create a react application, you can start by creating a directory and installing the relevant libraries manually. But there is always a quicker way to do this.
Use Create React App.
Because the project was created this way, the README file is mostly populated with instructions on how to run the app locally and this is super useful, especially if you are a full stack developer but not constantly working on the UI. It is easier to get back and remind yourself of what has to be done to get back on track.
Prerequisites
- Git - https://git-scm.com/downloads
- Node - https://nodejs.org/en/
- Install react developer tools for your favourite browser
Let’s go through the process of getting from creating the folder to getting to a functioning app.
Create the folder structure
After you get npm installed, create a directory and run the following:
npx create-react-app your-favourite-folder
npx is an npm command. It executes the binaries of the argument without having to download the entire library first, although it downloads everything behind the scenes. You can use this to run popular npm tools that you don’t necessarily need in the project, but could use to get some cool stuff done.
What got installed?
Taking a quick look at the package.json
Libraries needed for development:
- react - the core react library
- react-dom - the thing that interacts with the dom - virtual dom stuff
- react-scripts - webpack things wrapped under this one
You can also see that the scripts section is updated with a set of easy to run commands to get started with react.
public directory
This is where you’ll find the landing page, index.html
As you can browse to the index.html on github - you can see that on line 21 there is this line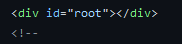
The entire react app is rendered inside this div.
This is where the react app is loaded while you run the app.
Let us take a look at the code. Go to index.js
This file is responsible for loading your app inside the index.html file.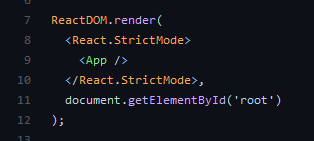
Most of your components generally go inside the src folder, you can determine how you want group your code inside this components folder. It is completely upto you.
What are the components in here?
- App - the parent component
- TodoItem - represents an item in the TodoList
- Todo - represents the TodoList - it just renders every TodoItem
- AddTodoItem - A component that lets you input new TodoItems
- Header - A component to render the Title and links
Building a UI Component - Intro to JSX and other concepts

UI components are written in files with a js extension but these weird files with JS and snippets of HTML are called a JSX file. If you have have built applications using ASP .NET or JSP or PHP you are probably familiar with this sort of a special file, which is populated with some server side components. But this one on the other hand, is fully rendering UI elements.
App class

Our primary component, the App component is a class that extends the Component class in React. Every component class has a render method that has the code required to display the app, which can refer to other components too.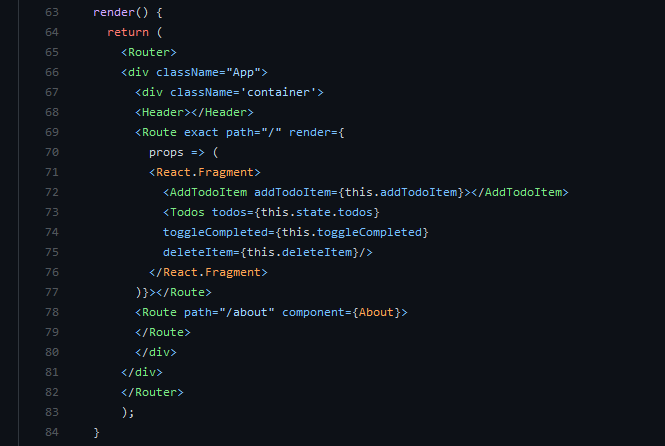
If your component is pretty simple and doesn’t have any state associated with it, then you can pretty much just write it as a function that returns what has to be rendered.
Fragments
Fragments are a special concept in react that lets you group multiple elements without adding extra nodes to the DOM. These days, cool kids, use a Short Syntax to write these special elements.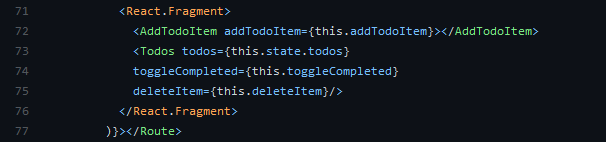
Props
Inputs to components are called props. So in the earlier screenshot:
In the above example screenshot, addTodoItem is a reference to a function in App.js.
You refer to the input passed into a component using this.props.inputParamName where inputParamName is the name of the input you param you just passed in.
State
Components can hold some state information. In a highly interactive feature rich app, there might be multiple components that have to communicate changes to its state based on user interactions. This is exactly what the state is for.
State and Props are both parts of the application that gets modified by the components. They are simple javascript objects however, State is private to the component, it isn’t exposed outside the component for modification directly. Whereas props are essentially input to the component.

States are to be considered immutable - meaning, everytime a part of the state changes, you basically create a new object cloned from the previous state. This is crucial to make it easy for you to understand changes happening to the state overtime.
Route management
React being a library that primarily helps build single page applications, it is important to manage navigation between different parts of the application. Every time a user clicks on a link, a different component is rendered in the index page under the appropriate route.
For this you need to install react-router-dom.
Routes are generally declared in your main App.js and different components are rendered inside different route specifications.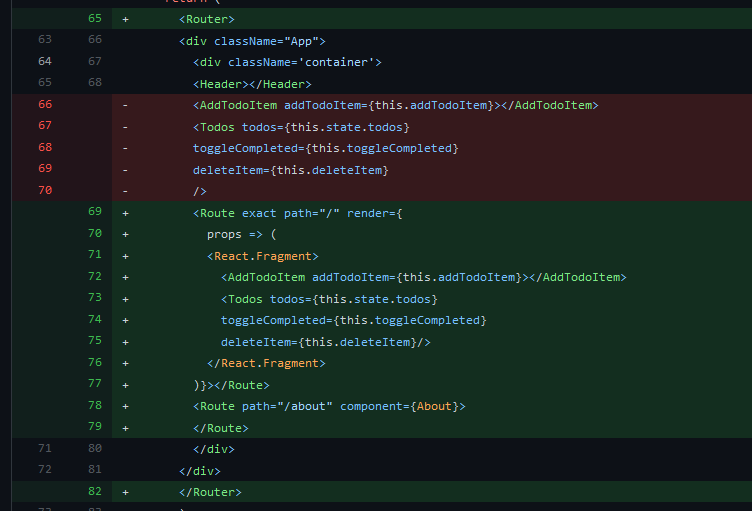
Two different routes - / and /about render different set of components. The root, loads the react fragment containing the AddTodoItem and the Todos, whereas the /about loads a simple About component.
The exact keyword, ensures that that routes elements are only rendered when the uri exactly matches /. Without this, the UI would render both routes together as the /about also has / in it.
Routing, seemed to me as a simple pattern match of the url. But I hope the earlier screenshots give you an idea of how simple the routing is. Of course, I haven’t come to passing input through routes yet.
HTTP
In todays world, most of our apps, are built with some sort of API interaction. So it is crucial that we have the ability to render ui elements that are populated with data fetched from a web api.
React doesn’t dictate what you use for HTTP interaction, which is great, because you can use your favourite http client library! I say this because, when I was learning Angular 2 years ago, was the first time I had to learn RxJS. Reactive programming is an entirely different paradigm and with little experience, it is a bit hard to get your head around the concepts. This can slow you down. However, we all make regular requests using HTTP and promises are simple to understand and definitely simpler than event streams to program around. Hence, it helps you get on track faster.
So in the TodoList app, I have made use of axios, a library that brad suggested. But any http client that lets you do all the HTTP requests based on a Promise, would be a good place to start.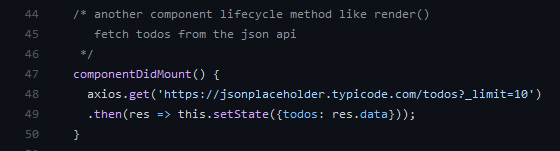
axios in action inside one of the lifecycle methods - https://github.com/lonelydev/react-todolist/blob/main/src/App.js
Other stuff
While following along, I learned a couple of other great things.
Two nifty apis that can be used for creating fake backends.
What next?
I will cover other more details as part of a different post. But for now.